Let’s say you want to start a modern C++ project. However, you have some requirements in mind that may be hard to achieve. First, the project should support development in the Visual Studio IDE but also provide a simple command line build experience. Since you want to be able to check your work, a low-friction unit testing environment is a must. Finally, all of this needs to be supported cross-platform — at least Windows and Linux to start with.
Certainly you can’t have all these at once, can you? Think again! With native support in Visual Studio for CMake (“Cross-platform Make“) including Linux targeting, cross-platform development has never been simpler.
To illustrate how to get started, let’s introduce a sample project structure:
- inc (public header file root)
- core (header files for `core` lib)
- src (source code root)
- app (executable target)
- core (static lib target)
- test (test code root)
Let’s create the public header file first, inc\core\Sample.h:
#ifndef SAMPLE_INC_SAMPLE_H
#define SAMPLE_INC_SAMPLE_H

#include <string>

namespace sample
{
namespace core
{

class Sample
{
  public:
    Sample(const std::string &name);

    const std::string &get_name() const;

  private:
    std::string name_;
};

} // namespace core
} // namespace sample

#endif
Remember that we’re cross-platform so for maximum portability we are using a compiler-agnostic include guard instead of the slightly more Windows-y #pragma once.
Let’s continue with the implementation file, src\core\Sample.cpp:
#include <Sample.h>

namespace sample
{
namespace core
{

Sample::Sample(const std::string &name) : name_(name)
{
}

const std::string &Sample::get_name() const
{
    return name_;
}

} // namespace core
} // namespace sample
Of course, we would be remiss without a corresponding unit test for this (admittedly embarrassingly basic) class. In order to fulfill our cross-platform promise, we can pick one of these: Google Test or Boost.Test. Since Google Test is well-integrated with CMake, we will declare it the winner for today.
Here is test\SampleTest.cpp:
#include <Sample.h>
#include <gtest/gtest.h>

namespace sample
{
namespace core
{

TEST(SampleTest, GetName)
{
    Sample hello("hello");

    ASSERT_EQ("hello", hello.get_name());
}

} // namespace core
} // namespace sample
To complete the example, we’ll build an executable entry point in src\app\main.cpp:
#include <iostream>
#include <Sample.h>

using sample::core::Sample;
using std::cout;
using std::endl;

int main(int argc, const char *argv[])
{
    if (argc != 2)
    {
        cout << "Please pass a string!" << endl;
        return 1;
    }

    Sample world(argv[1]);
    cout << "Hello, " << world.get_name() << "!" << endl;
    return 1;
}
This is all great, but so far we have a bunch of files on disk with nothing to stitch them together. If we were doing straight Windows development, this is where we would create some .vcxproj files. But not today — we are going all-in with CMake!
Following from our project structure above, we need three binary targets: a static library (src\core) and two executables (src\app for production code, test for test code). We would like our test executable to integrate with CMake’s test system, CTest, along with smoke tests of the product for good measure. To achieve this, we could write the following CMakeLists.txt in our project root:
cmake_minimum_required(VERSION 3.17)
project(sample LANGUAGES CXX)

include(GoogleTest)
find_package(GTest)

add_library(sample-core
    src/core/Sample.cpp
)

target_include_directories(sample-core
    PUBLIC
        ${CMAKE_CURRENT_SOURCE_DIR}/inc/core
)

add_executable(sample-app
    src/app/main.cpp
)

target_link_libraries(sample-app
    sample-core
)

add_executable(sample-test
    test/SampleTest.cpp
)

target_link_libraries(sample-test
    sample-core
    GTest::GTest
    GTest::Main
)

enable_testing()

gtest_discover_tests(sample-test)

add_test(sample-app-UsageError
    sample-app
)

set_tests_properties(sample-app-UsageError PROPERTIES
    PASS_REGULAR_EXPRESSION "Please pass a string!"
)

add_test(sample-app-HelloWorld
    sample-app world
)

set_tests_properties(sample-app-HelloWorld PROPERTIES
    PASS_REGULAR_EXPRESSION "Hello, world!"
)
As promised, we have targets sample-core for the lib, sample-app for the executable, and sample-test for the tests. In addition, we’ve defined two command line tests with add_test which verify that the input matches an expected output expression.
We’ve glossed over the fact that Google Test is an external dependency. How are we supposed to get it on Windows in a way that will be seamless for VS / CMake? This is where vcpkg comes in. With one simple command vcpkg install gtest --triplet x64-windows we will be able to use Google Test in any 64-bit Windows CMake target.
So far, so good. But we haven’t even cracked open Visual Studio yet. Since we have no solution or project files, we need to tell VS to open our project folder instead. We can then create two configurations, x64-Debug and x64-Release, to support building debug or release binaries respectively. In this case, the provided defaults are fine so we can just save the generated CMakeSettings.json file and move on:
{
  "configurations": [
    {
      "name": "x64-Debug",
      "generator": "Ninja",
      "configurationType": "Debug",
      "inheritEnvironments": [ "msvc_x64_x64" ],
      "buildRoot": "${projectDir}\\out\\build\\${name}",
      "installRoot": "${projectDir}\\out\\install\\${name}",
      "cmakeCommandArgs": "",
      "buildCommandArgs": "",
      "ctestCommandArgs": "",
      "variables": []
    },
    {
      "name": "x64-Release",
      "generator": "Ninja",
      "configurationType": "RelWithDebInfo",
      "buildRoot": "${projectDir}\\out\\build\\${name}",
      "installRoot": "${projectDir}\\out\\install\\${name}",
      "cmakeCommandArgs": "",
      "buildCommandArgs": "",
      "ctestCommandArgs": "",
      "inheritEnvironments": [ "msvc_x64_x64" ],
      "variables": []
    }
  ]
}
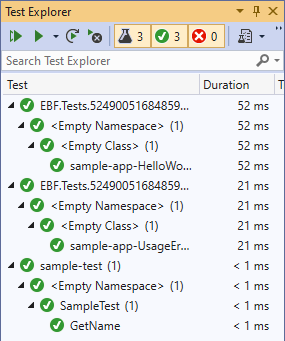
After building either one of the configurations, the Test Explorer should populate with the Google Test suite and the two command line tests in CMake. (Note that the CMake tests still have an unfriendly generated group name as of this writing.) Assuming everything was done correctly up to this point, the tests will pass!
Here is the GitHub repo with all the above files: CMakeSampleVS
At this point we have the beginnings of a cross-platform project, though we’ve only proven that it works in Visual Studio on Windows. Also, didn’t we say we want command line build capabilities as well? We’ll tackle these issues in later posts.
Pingback: Cross-platform without complexity: remote Linux – WriteAsync .NET
Pingback: Cross-platform without complexity: command line – WriteAsync .NET
Pingback: Cross-platform without complexity: shared libraries – WriteAsync .NET